Creating a Google+ community could be a brilliant idea if you will use it for your internet marketing endeavors. Community in Google plus is the equivalent of Facebook group. When you create a group in Google+, make sure you do know its purpose (where it is intended for).
There are many internet marketer are intelligently using Google+ and Facebook groups to gather many people and make them as their groups’s members and they turned their members into regular website or blog visitors and suddenly make them as their customers.
If you are one of the many aspiring online marketer and want to try Google+ group, here’s the guide on how create a Google+ plus community.


How to Create a Google+ Plus Community
Step 1. Login to plus.google.com You will have an automatic Google+ account once you created a Gmail account. Just use your email address and password.
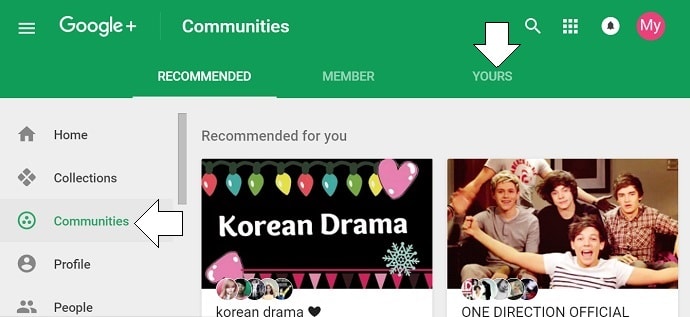
Step 2. Click “Communities”. In the left side of the Google plus home page, you have a lot of options to choose such as collections, communities, profile, people, notifications, settings, etc.
Step 3. In the navigation bar, click “Yours”. You have three options, it’s either you want to browse recommended communities and the group you are a member at or you will create your own Google+ community.
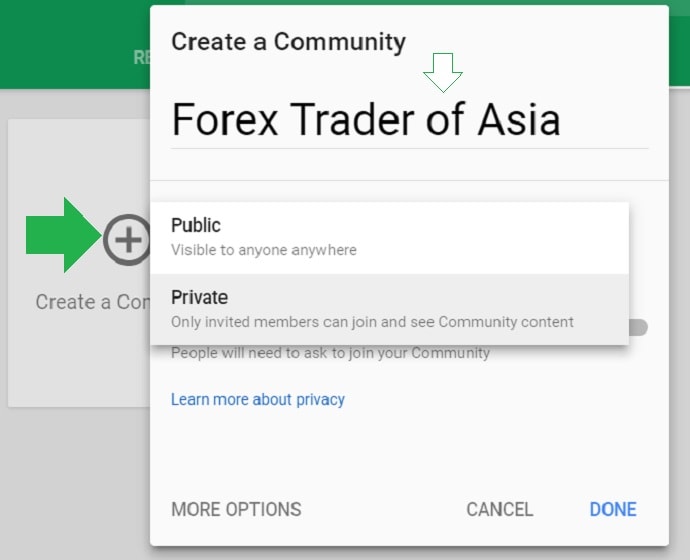
Step 4. Create community. A new tab will pop up.
Step 5. Name your Google+ community. You are required to name your Google+ community. Name it relevant to what is your community all about. If you intend to invite all types of investors, then name your community to “investing group” or “investment group”. Or just use, stock market investment group or forex trading experts if you’re into forex.
Step 6. Choose a setting for privacy. Should you make your Google+ community visible to anyone? That means, anyone can join in the group. While on the other hand, if you will choose to make your community in private, this means only invited members can join and see your Google+ community content.
Other settings you need to notice is that when you are creating a Google+ community, you are allowed to invite or if someone wants to join, they can easily ask you to join your community. Activate the “ask to join”. Also, to make your group free of spams, hold your member’s post for review. This means, their posts submitted to the community is needed for review before they will go live in the stream.
Step 7. Click “Done”. Do not forget to click “Done” Unless you you change your mind and don’t really want to create a Google + plus community, then click “Cancel”.
Tips & Warnings
- When creating a Google + community, you need to think first its purpose. Don’t just create a community.
- Name your community relevant to its uses and type of members. If your community is for single parent, then name it related to single parent. Say something like “single parent in Texas”.
- Invite people to join your group. Check your Google+ community for member’s request (joining), check spam post and post that needs to be reviewed by the community moderator.


DISCLAIMER: The information provided on InvestmentTotal.com is for general informational purposes only. The content on this website is not intended to be, and should not be construed as, professional financial advice.